Blog

Use String Maps to Set Option Set columns in Power Automate
Power Automate is a great tool to expand the capabilities of Dynamics 365. If you use it long enough, you’ll likely become familiar with the nuances of setting the values for different column types. One of which would be option sets. While you can use the drop-down to pick the option in some cases, it’s also possible to run into instances where you will need to set the column based on data from another step. Now there are a variety of ways to work around this if you have the value. However, it gets a bit more tricky if you only have the label.
Import from an Excel Table
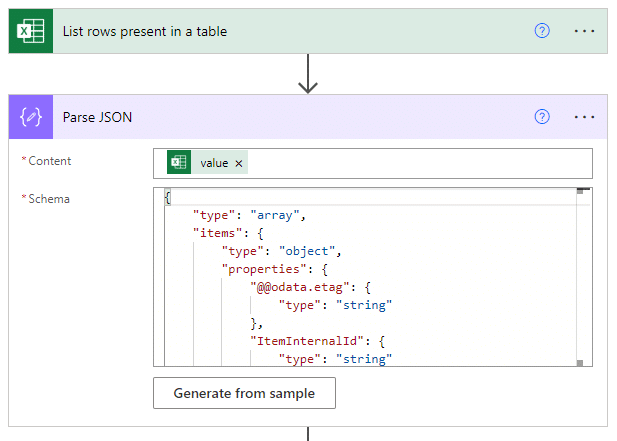
One scenario you may run into this is with an import from an Excel table. One thing to keep in mind is that the data we are taking in will need to match the option set label exactly. If an Excel table is the data source using data validation can help enforce this. To begin, we will have the Excel table pulled into the flow Then we are going to want to list all rows and then parse the JSON from that step. You can generate the Schema for this step by running a test of the flow and putting the array portion of the ‘List rows present in a table’ step into the Generate from sample section of the Parse JSON step.
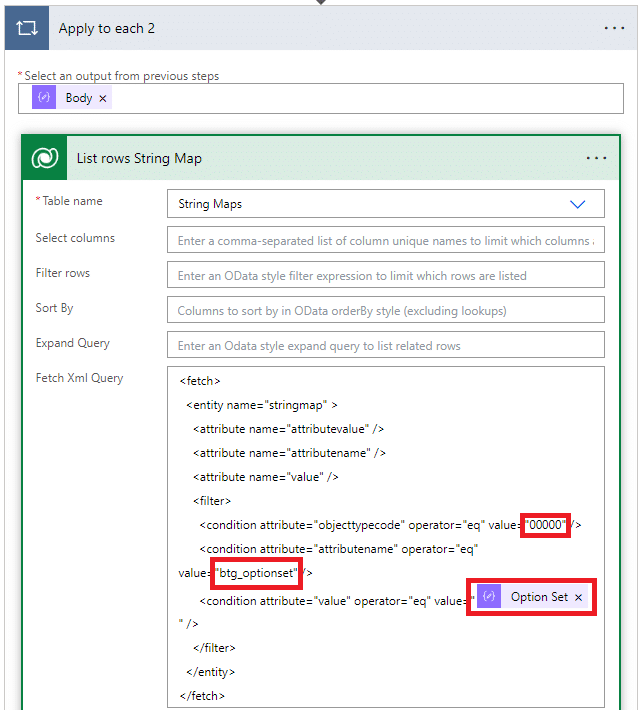
Now we can use an apply to each step on the body of the Parse JSON step and finally get to the String Maps. To do this we’ll use a Dataverse list rows step and select String Maps as the table name. This is the table that stores option sets/choices in Dataverse. Next, we can insert the following Fetch XML Query replacing the highlighted sections with your information. The objecttypecode is going to be the most tricky to get ahold of. This is a value that’s associated with each table in Dataverse. One quick way to get ahold of it is to use this API call (insert environment into the URL):
https://yourenvironment.api.crm9.dynamics.com/api/data/v9.1/EntityDefinitions?$select=LogicalName,ObjectTypeCode . This will list all object type codes in the system. Then you can just search for the name of the table you’re working with and grab the code.
Update the Attribute Name
Next, we can update the attribute name portion. This will just be the logical name of the table column this option set is on. Note that this ISN’T the logical name of the option set itself. Finally, you can go ahead and replace the value attribute with whichever JSON output this string map is for.
![]()
Now we’re just about done! The list rows step will simply return the option set value (called AttributeValue) associated with the label that was output in. The final caveat is that since we are using a list rows step the flow will try to use the apply to each if you insert the AttributeValue on its own. We can get around this by using the first expressions whenever you want to use the value.
first(outputs(‘List_String_Map_rows’)?[‘body/value’])?[‘attributevalue’]
If you’d like more information about services available for power platform take a look at our Microsoft Power Platform services page.
Reach out to Beringer today!
We love to implement Microsoft Dynamics 365 and Power Platform solutions here at Beringer. We’ve been working with Microsoft Dynamics since its inception, and we’re always finding innovative ways to implement the latest tools and help automate business processes.
Beringer Technology Group, a leading Microsoft Partner specializing in Microsoft Dynamics 365 and CRM for Distribution also provides expert Managed IT Services, Backup and Disaster Recovery, Cloud Based Computing, Email Security Implementation and Training, Unified Communication Solutions, and Cybersecurity Risk Assessment.
Recent Posts


How can we help?
Whether you're seeking a fully managed IT solution or expert assistance with a Microsoft solution, we're here to provide expert advice whenever you need it.
Call us at (800) 796-4854 or complete the form below and we'll help in any way we can.